Successfully transplanting a Japanese maple tree is based on several factors.
1. The size of the tree to be transplanted
2. The Age of the tree
3. The overall health
4. What is the condition of the root system
5. Timing (when to transplant)
The size of the tree is most important, not to whether or not the tree will survive a transplant, but what size of a root ball must be dug, picked up, transported, and replanted. In theory, any size tree can be moved if enough of the root system remains undamaged during the transplanting. A root system of a mature 6-8 foot Crimson Queen Japanese Maple allowed to develop naturally without any restrictions can spread out over 12 feet wide and up to 3 feet deep. This is a huge root ball and probably not anything a homeowner without heavy equipment would be able to tackle.
However, a 3-4-year-old tree 3 foot tall and wide is a size a homeowner could move with some help. Generally speaking a tree with a trunk caliper of less than 1 inch (about the size of a broom handle) could be moved with a 12-18 inch root ball. That would be tall and wide and weighing about 50-80 lbs. A 1-2 inch caliper tree would need an 18-24 inch root ball weighing about 80-150 lbs, a 2-3 inch caliper tree a 24-30 inch root ball weighing about 150-300 lbs.
Age is also a factor, the older the tree the further away from the trunk the feeder roots are located. For the sake of not getting too complicated, the root tips are where the majority of water and nutrients are absorbed. The part between the root tip and the trunk of the tree is more for structural support and does little to keep the plant nourished. So the older and larger a tree is the larger the root ball must be to contain enough viable root tips to continue to supply the tree with water and nutrients.
A healthy tree will have a better root system and will be more likely to survive a transplant. Normally a tree that looks sick on top will also have a compromised root system. It is possible and likely that some of the only viable roots will be severed which will cause the tree to die as soon as it is stressed due to heat or drought.
Timing is also very important. It is best to transplant in late winter or very early spring just before the tree would naturally start breaking bud. I like this time because it gives the tree the shortest time with a compromised root system before the soil starts to warm up and allows new roots to grow. Also by cutting some roots when digging the root ball the tree will automatically be set back and will not push out new leaves as quickly. This will give the root system some extra time to become established before the tree has to support all the new leaves.
It is a good idea to prune about 25% of the tree's canopy back during the transplant. This will also reduce the stress on the smaller root system.
Adding a low amount of a low nitrogen fertilizer and root stimulator during planting will help nourish the tree and aid in survival.
Keep the soil moist but not overly wet. Roots grow when looking for water. If you keep the soil overly wet the roots will have no need to grow and will remain weak. Once the temperature becomes hot the tree will quickly become stressed because of the weak root system and will have a much lower rate of survival.
Follow these tips and you should be able to successfully transplant your Japanese Maple Tree

Sunday, December 19, 2021
Sunday, September 20, 2015
Transplanting a Japanese Maple or any Deciduous Tree in your Garden
Successfully transplanting a Japanese maple or any deciduous tree is based on several factors.
1. The size of the tree to be transplanted
2. The Age of the tree
3. The overall health
4. What is the condition of the root system
5. Timing (when to transplant)
The size of the tree is most important, Not whether or not the tree will survive a transplant, but what size of a root ball must be dug, picked up, transported and replanted. In theory any size tree can be moved if enough of the root system remains undamaged during the transplanting. A root system of a mature 6-8 foot Crimson Queen Japanese Maple allowed to develop naturally without any restrictions can spread out over 12 feet wide and up to 3 feet deep. This is a huge root ball and probably not anything a home owner without heavy equipment would be able to tackle.
However a 3-4 year old tree 3 foot tall and wide is a size a home owner could move with some help. Generally speaking a tree with a trunk caliper of less than 1 inch (about the size of a broom handle) could be moved with a 12-18 inch root ball. That would be tall and wide and weighing about 50-80 lbs. A 1-2 inch caliper tree would need a 18-24 inch root ball weighing about 80-150 lbs, a 2-3 inch caliper tree a 24-30 inch root ball weighing about 150-300 lbs.
Age is also a factor, the older the tree the further away from the trunk the feeder roots are located. For the sake of not getting too complicated, the root tips are where the majority of water and nutrients are absorbed. The part between the root tip and the trunk of the tree is more for structural support and does little to keep the plant nourished. So the older and larger a tree is the larger the root ball must be to contain enough viable root tips to continue to supply the tree with water and nutrients.
A healthy tree will have a better root system and will be more likely to survive a transplant. Normally a tree that looks sick on top will also have a compromised root system. It is possible and likely that some of the only viable roots will be severed which will cause the tree to die as soon as it is stressed due to heat or drought.
Timing is also very important. It is best to transplant in late winter or very early spring just before the tree would naturally start breaking bud. (As opposed to the autumn, which is a primary time to plant a new Japanese Maple tree). I like this time because it gives the tree the shortest time with a compromised root system before the soil starts to warm up and allows new roots to grow. Also by cutting some roots when digging the root ball the tree will automatically be set back and will not push out new leaves as quickly. This will give the root system some extra time to become established before the tree has to support all the new leaves.
I also like to prune about 25% of the trees canopy back during the transplant. This will reduce the stress on the smaller root system.This is an important factor that most amateur gardeners do not follow and it can easily lead to a lack of success when transplanting. So prune, Prune, PRUNE!

Adding a low amount of a low nitrogen fertilizer and root stimulator during planting will help nourish the tree and aid in survival.
Keep the soil moist but not overly wet. Roots grow when looking for water. If you keep the soil overly wet the roots will have no need to grow and will remain weak. Once temperatures becomes hot the tree will quickly become stressed because of the weak root system, and will have a much lower rate of survival. It is important that this ratio of root to tree will exist regardless of the care taken, therefore you want to carefully follow the instructions of not over watering and at the same time not allowing to dry out. This can be tricky, and it takes baby-sitting the tree and checking it on a daily basis. Remember this is one of the most crucial times in the entire transplantation process. The same will apply to a newly planted tree. Don't let the roots dry out completely or you may lose the entire operation and your tree.
The tree watering bags that are sold at your nurseries come in very handy at this time. Put one in place, and keep it full of water. The soil will slowly absorb the water, remain moist but not wet, and will still not allow for the tree to dry out. But be careful that complacency doesn't set in and you ignore the signal that the tree is being over/under watered. Check with your fingers every day and make sure you are putting in the correct amount of water.
By following these tips and you should be able to successfully transplant your Japanese Maple Tree (or any other deciduous tree you may wish to move in your garden.)
Tuesday, August 25, 2015
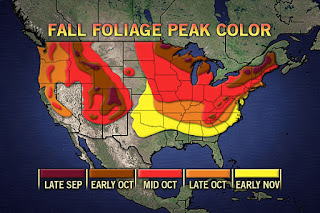
Newest Feature - Fall Foliage Reports
Beginning September 1st we will begin giving the latest Fall Foliage Reports and Forecasts in answer to requests from our customers and readers.
Don't forget to send in your ideas of what we could add to our site to make it more useful in your gardening needs or gardening enjoyment. You're number 1 to us and we are always seeking to make your browsing experiencing at our site more enjoyable and instrumental.
Don't forget to send in your ideas of what we could add to our site to make it more useful in your gardening needs or gardening enjoyment. You're number 1 to us and we are always seeking to make your browsing experiencing at our site more enjoyable and instrumental.
Saturday, March 14, 2015
A Better Way To Plant Shrubs and Trees
A Better Way To Plant Shrubs and Trees
by Dr. Walter Reeves
For starters, dig a shallow hole and avoid soil amendments.
How you plant a shrub or tree determines whether the plant struggles to grow, dies outright, or takes off and thrives. I know this firsthand. For 20 years I conducted research with a wide variety of ornamental shrubs and trees, planting them in different ways and observing the results. I learned, often to my surprise, that many common recommendations about planting are wrong or useless. You may think that the traditional approach to transplanting-digging a deep planting hole, amending the soil with organic matter, pruning branches to compensate for lost roots, and not fertilizing at planting time produces good results, but my research shows that a different approach works better.
Whether you're planting a bare root, balled and burlapped (B&B), or container plant, your shrub or tree is more likely to thrive if you provide a well-drained site, a wide, shallow planting hole, the right kind and amount of fertilizer, and regular watering. It will do even better if you use organic matter as a mulch instead of as a soil amendment and leave the plant unpruned, unless it has weak, damaged or ill-placed branches.
The time of year is another important consideration when you plant a tree or shrub. Spring, summer and fall can all be appropriate planting times, as long as you take into account the impact of each season on plant growth. In many parts of the country, the cool weather, high humidity, and abundant rainfall of spring make this a particularly good time to plant. In summer, warmer temperatures promote growth but also increase a plant's demand for water, so if you decide to plant at this time, choose a plant that has been well watered at the garden center, and irrigate it as needed after planting. Fall planting also has advantages - cooler air temperatures reduce the demand for water while the lingering warmth of the soil encourages rapid root growth. Take care, however, to allow your transplant enough time to become established before winter sets in.
Check the soil drainage before you plant. No amount of care in planting can make a shrub or tree thrive if the soil is so wet that the roots don't get enough oxygen and they suffocate. To test drainage, dig a hole 8 in. wide and 12 in. deep, fill it with water several times during the day until the soil is saturated and then fill it again in the evening. If there is standing water in the hole 24 hours later, you must improve the drainage or limit yourself to the relatively few woody plants that tolerate wet sites.
The easiest way to improve drainage is to plant on berms or raised mounds of soil. Start by loosening the soil beneath the mound to a depth of 4 in. to 6 in. Next, pile additional topsoil 6 in. to 1 ft. high in a circle at least three times as wide as the root system of the plant, and set it in place as if the top of the mound were ground level. Mounds tend to dry quickly (and the lighter the soil, the faster they dry out), so you have to water diligently the first, and often the second year, until the roots establish themselves.
The surest way to improve drainage is to run perforated drain pipe through a gravel-filled, underground trench. The pipe must run to a low spot to carry away water. Since most roots are in the top 1 ft. of soil, the pipe must be installed 16 in. to 18 in. deep.
If you can't improve the drainage plant shrub or tree species that tolerate wet sites. For help in choosing a suitable plant, check with a local nursery or consult these books: Landscape Plants for Eastern North America, by Harrison L. Flint, John Wiley & Sons, 1 Wiley Drive, Somerset, N.J. 08875); Pocket Guide to Choosing Woody Ornamentals by Gerd Krussmann Timber Press, 9999 S.W. Wilshire, Portland, OR 97225); and Know It and Grow It 11: A Guide to the Identification and Use of Landscape Plants, by Carl Whitcomb, Lacebark, Inc., P.O. Box 2383, Stillwater, OK 74076).
Dig a wide planting hole
The ideal planting hole is wide and shallow - at least twice the width of the root system of the plant, and the wider the better. Roots need oxygen for growth, and they get most of it from open spaces between particles of soil. A broad circle of loosened soil around a new shrub or tree helps to insure that the roots have the air they need during the first growing season.
Dig a planting hole the same depth as the root system of your shrub or tree. Deeper holes can lead to trouble. The soil may settle enough after transplanting to create a depression around the plant. If rain collects and stands in the depression, or if soil washes in and packs around the trunk, there is a danger of encouraging root and trunk diseases. Many publications suggest digging a deep planting hole, then packing the soil in the bottom to prevent settling. Since air is vital to root growth, it makes no sense to dig the soil out, then pack it back in.
Prune sparingly, if at all
On the face of it, pruning a shrub or tree at planting time sounds plausible. When a nursery digs up a bare-root or a B&B plant, most of the root system remains in the ground, producing a plant with a top too big for its roots. Even container-grown plants can end up disproportionately top-heavy after their pot bound roots are pruned away.
It would seem that such extensive root loss would prevent the plant from taking up enough water, so you'd need to cut back the top to reduce its water needs. But, in fact, my research shows that even if shrubs or trees lose many roots during transplanting, the unpruned plants do better than the pruned ones during the first year. They put on more growth, and fewer of them die. After two years, the pruned trees catch up with their unpruned neighbors, but pruning takes its toll. The pruned trees, especially those with one-third or more of their branches removed, often have less attractive shapes. Also, severe pruning frequently prompts young trees to produce new branches that are too close to adjacent ones, or that grow out from the trunk at narrow angles. By contrast, unpruned trees generally have better-spaced branches with stronger angles, and they look more natural.
Why does an unpruned shrub or tree thrive? I have a theory. The root system, though diminished in size by digging or pruning, appears to be able to keep up with the early demand for water from the top if the soil has plenty of moisture. Meanwhile, the root system of an unpruned plant grows faster than that of a pruned plant because expanding leaf buds produce hormones and sugars that stimulate root growth, and the more buds, the faster the growth. Plants with better root systems are more likely to thrive, especially during hot, dry weather.
While I've found that pruning for balance between top and roots does no good, corrective pruning does have a place at planting time. If a shrub or tree has a cluster of branches growing too close together for good looks or health, remove a branch or two. You also should remove damaged branches; the weaker of two branches that cross; and branches that ascend from the trunk at a steep angle, because their crotches, the places where the branches meet the trunk, will always be weak.
Hold the soil amendments
For decades, gardeners have mixed organic amendments into the soil to help establish newly planted shrubs and trees. The resulting "lighter" soil might sound like a good idea, but I've found that soil amended with peat moss, pine bark and similar organic materials produces no better results than unamended soil and sometimes gives less vigorous growth. Of all of my findings, this one has generated the most controversy among professionals and home gardeners alike. When I finished my first talk about these experiments, the moderator implied that my results were somehow unpatriotic, commenting that he didn't intend to ask me what I thought about apple pie or motherhood. Actually, I, too, once believed in the need for soil amendments. In fact, my first experiments were designed to learn which additives were best for planting, and I was as surprised as anyone to learn that none of them produced better results than unamended soil. I've since repeated my experiments in several parts of the country and on different kinds of soil, and got the same results.
In the first year or two after planting, the difference between shrubs and trees in amended soil and unamended soil is moderate above ground, but often striking below ground. Since plants in amended soil rarely show visible signs of stress, there is no reason to question the practice. But after digging up hundreds of plants, I've learned that plants in unamended soil send roots as far as 3 ft. or 4 ft. from the original root ball in a year or two, while the roots of plants in amended soil are still largely confined to the planting hole.
Roots in amended soil grow more slowly because they often have too little or too much water. On well-drained sites, soil amendments such as peat often deprive the roots of moisture. The amended soil quickly loses much of the water it absorbs to the surrounding, often finer-textured, soil, which acts like an ink-blotter and pulls water from the peat by capillary action. The loss is very rapid when the ground is relatively dry, and is compounded by the demand for water from the top growth of the plant. During hot, dry spells, when a plant loses lots of water, the amended soil may be dry enough to cause plant stress even though the surrounding unamended soil is still moist enough to support growth.
On poorly-drained sites, soil amendments can collect too much water. The amended soil has a coarser texture than the surrounding soil and therefore allows water to penetrate more rapidly. During a rainy period or prolonged irrigation, the planting hole can fill up like a bathtub, causing roots to suffocate, or suffer enough stress and dieback to encourage root diseases.
Some acid-loving plants, such as azaleas, do grow better when the soil is heavily amended with organic matter, which tends to be acidic as it breaks down. The benefit, however, stems largely from the decrease in soil Ph rather than improved soil structure. You could skip the peat moss, lower the pH with powdered or granular sulfur and have equally good results.
If you have organic matter available, you'll have better results if you use it as a mulch, imitating the way organic matter would be added to the soil in nature, rather than using it as a soil amendment.
Fertilize as needed
Should you fertilize newly-planted shrubs and trees? Yes, provided a soil test shows that fertilizer is, in fact, needed. It's important not to deprive the plant of nitrogen or other nutrients following planting.
You can apply fertilizer by spreading it on the soil surface, or by adding it to the planting hole. Much has been said and written to warn gardeners that fertilizer in the planting hole causes root damage, a bugaboo probably based on experiments in the 1920s and 30s when the principal form of nitrogen fertilizer was sodium nitrate. Fertilizers are salts. Those with a high salt index (the measure of saltiness)- may absorb water that roots need when the soil is dry. Leaves die, and the damage is misleadingly called fertilizer burn. Today, though, there are forms of nitrogen fertilizer that can be added to the planting hole safely. For example, urea, one of the most widely available forms of nitrogen fertilizer, has a salt index of 1.6 per.
Test the soil before you plant, and apply no more fertilizer than the soil test calls for. (Any fertilizer applied at excessive rates can cause problems.) If fertilizer is needed, choose one with a low salt index. To supply nitrogen, look for a formulation that includes ureaformaldehyde, IBDU (isobutylene diurea) or ammoniated phosphate. If your soil has a phosphorus deficiency, incorporate superphosphate (with an analysis of 0-20-0) or triple superphosphate (0-46-0) into the soil as the test results suggest. (It is important to note that phosphorus does not move through the soil. It must be mixed into the root zone in order to be readily available to plants.) The salt index of superphosphate and triple superphosphate is near zero. If you have to add potassium, be aware that potassium chloride (muriate of potash), the most common potassium source, has a very high salt index. Use it with care.
In general, fertilizers derived from organic sources pose little risk of salt damage because they release nutrients very slowly. Slow-release or controlled-release chemical fertilizers offer the same advantage; even if they contain nutrients in forms that have high salt indices, they become available to plants so slowly that they are unlikely to cause any harm. Organic and other slow-release fertilizers cost more initially, but they don't need to be applied as frequently.
In good soils, fertilizing at planting time has little impact on the first flush of top growth following planting. That growth is influenced mostly by growing conditions the previous summer and fall, when buds were formed. However, remember that fertilizing at, or shortly after, planting encourages additional growth that year and promotes bud development the first fall following planting. These buds will produce the spring flush of growth one year after planting, and it's that growth that reflects how "happy" the plant is in the new site.
Lay on the mulch
Young shrubs and trees do better when competition is kept in check, and mulch is the best way to supply the relief they need. Mulch suppresses weeds, conserves moisture, checks erosion, prevents soil compaction in heavy rains and moderates soil temperature. Pine bark, aged wood chips, pine straw, chopped leaves - most organic materials, in fact - work well as mulch.
Apply mulch to a sizable area around a newly-planted tree or shrub - the roots will eventually extend far from the trunk. The right depth for mulch is 2 in. to 4 in., depending on the type of soil it covers. Less mulch is required for heavy soils, more for light soils. In either case, mulch that is too deep can cause problems. It can prevent the soil from drying out, depriving plant roots of necessary oxygen. Extremely deep mulch also may encourage rodents which can damage plant stems. Do not place mulch more than 2 in. deep next to the stem of a tree or shrub. an excessively deep, fine-textured mulch around the stem may kill the bark near the soil line, resulting in the eventual death of the entire plant.
Keep in mind that organic mulches may temporarily tie up a substantial portion of soil nitrogen, which is used by the microorganisms that break down the mulch. In time, the nitrogen bound by the microorganisms will be released, but in the short run, additional nitrogen may be required to support vigorous growth of new plantings. To prevent problems, broadcast a bit of nitrogen fertilizer on the soil before you mulch.
Water diligently
All plants need soil with adequate moisture, especially while their root systems are growing rapidly. Water is the necessary ingredient for plant growth that is most often in short supply. If rain falls short, make up the deficit by watering deeply every five to seven days, taking care not to suffocate roots by overwatering. In my research, supplemental watering throughout the first growing season made an enormous difference in the growth of transplanted shrubs and trees.
I recommend drip irrigation systems whenever possible. They conserve moisture, while minimizing the liability of over watering. Since you don't wet the foliage, you don't encourage leaf diseases. The key to using drip irrigation is to water thoroughly, then allow the soil to dry moderately before watering again. Placing mulch over the drip system helps slow evaporation of moisture from the soil.
Start with a healthy plant
I have one last suggestion to offer about planting shrubs and trees: select only thrifty plants, those grown properly at the nursery and handled with care before sale. Thrifty plants are those with good, deep leaf color and plump stems and buds. The key to successful transplant establishment is the energy inside the plant. This is more important than what is done outside the plant. All the care in the world cannot make a sickly plant thrive. (This is our main goal at Leaves and Petals... to deliver you with exactly this type of plant. And that is why our plants thrive once they become established. There is a difference, ordering from us will show you how great that difference is!)
Once you have chosen a healthy specimen, it is up to you to provide the conditions that will enable the plant to adapt to its new site and prosper there. Give it a wide hole, the necessary fertilizer, mulch and plenty of water, and it will reward you with vigorous growth.
Above information provided by Dr. Walter Reeves
Sunday, March 8, 2015
Creating a Childrens Garden

Creating a garden for a child is a gift for both you and the
child you’re creating it for. The garden should not only teach your child about
butterflies, bees and flowers but should stimulate senses as well. Because
children do respond to color readily and also like to touch and smell things,
you need to incorporate all these into your garden. It needs to be
entertaining, inviting and child safe.
 |
| It needs to be entertaining, inviting and child safe. |
What to do
You need to have your child involved from step one which
would be choosing the shape of the garden. It should be something simple like a
circle, a square or a shape like a diamond or butterfly. When you've decided
what shape to make your child’s garden then you’ll need to dig up and amend the
soil. Letting your child dig in the dirt is a great past time and it instills
the basics of gardening. Your child will have more of a sense of “it’s my
garden” if he or she is actively involved.
 |
| Children should be actively involved |
 |
| /Watering her garden |
Choosing the plants
When you chose plants for the garden, have your child help
pick them out. Take him or her with you to the Gardening Center or pull up an
online gardening center and see what strikes their interest and why. Sunflowers
are a great choice as well as coneflowers,
Lamb’s Ear, snapdragons, pansies and forget-me-not. The soft fuzziness of the
Lamb’s Ear is fun to touch and the snapdragon’s mouth opens and closes. The
happy faces on the pansies and the daisy like petals with the hard center in
the middle of the coneflower will liven up your child’s tactile senses. Also
Ornamental grasses such as, White and Pink
Pampas Grass, Blue Festuca,
or Zebra Grass,
will make a nice addition with their different sizes and textures. Scarlet Bee Balm
will give your child an up close and personal encounter with bees at work.
If you have enough room, a small wandering path from flower
bed to flower bed is perfect for keeping a child’s attention. Also, you need to
remember since your child is small, keep everything “child size”. Perhaps a
small bench for sitting or a bird feeder at a height your child can add the
seed to. You can even add some fun solar lights that glow at night in different
colors.
 |
| keep everything “child size” |
If you do add a water feature, please make it child safe. If
you put in a pond with goldfish and plants, make sure you fasten a grate or
covering of some kind so your child can’t access it. Another option is a small
fountain that can be set on a stump or on top of a large rock. A pair or two of
wind chimes on a stake or in a small tree is always welcome as well as
pinwheels whirling around in the breeze.
When you teach children how to garden you are also
unleashing their creativity and getting them outdoors. This gardening skill is
something that can be passed on from generation to generation for years to
come.
Monday, February 9, 2015
How to Select Your Japanese Maple Tree
How to Select your Japanese Maple Tree
Selecting the proper Japanese maple Tree for your garden or landscape depends on 5 factors: hardiness, location sun or shade, mature size, type lace leaf or palmatum and preferred leaf color.
Tip 1 Choose a variety that is rated to be cold hardy in your zone. If you are planting it in a pot or container above ground choose a variety that is at least two cold zones hardier than your zone.
Tip 2 Determine how large you can allow your tree to grow. With a little pruning once or twice a year Japanese Maples are very easy to maintain a specific size. But if you prefer to not prune, you will want to choose a variety that will naturally only grow to the size that will work in the allotted space both height and width.
Tip 3 Where are going to plant it, sun or shade? Most Japanese Maples prefer morning sun and afternoon shade. Planting on the east side of a fence or building provides the best environment for Japanese Maples. Avoid all day full sun locations especially in southern states. Japanese Maples can live in that environment, but usually leaf scorch will occur when temperatures rise above 90 degrees and the sun is shining directly on them.
Tip 4 Japanese Maples generally come in 2 types:
Dissectum (aka weeping or lace leaf) or Palmatum (aka upright or standard).
Most common to the trade are the lace leaf types, most have red or purple leaves with a few green leafed varieties. I'm not aware of any variegated lace leaf varieties.
Palmatum types are about 60% red or purple leafed, 30% green leafed and 10% other (variegated, gold, multi-colored) . Most lace leaf types are weeping varieties, although a few upright lace leafs do exist. Inaba Shidare is a good upright red lace leaf and Seiryu is a good green upright variety.
One of the most important factors when considering which type to grow is sun exposure. The lace leaf types typically cannot tolerate as much direct sun and wind as palmatum types. The leaves are much more delicate do to the thickness of the leaf and the width of the leaf lobes. Planting a lace leaf Japanese Maple in full sun is not advised and another selection should be considered.
The upright red type varieties that are well known for their ability to tolerate sunnier locations are Bloodgood and Emperor 1.
Osakazuki and Omure yama are good green uprights with great fall color. Red Select and Ever Red are said to be the more tolerant to direct sun and Virdis and Green Mist are good green varieties for sunnier locations. Please keep in mind the mentioned varieties are more tolerant of sunnier locations, but still may show burning on the leaf edges.
Tip 5 What leaf color do you prefer? red, green or variegated. Green leafed varieties can tolerate sunnier and hotter exposure than red leafed or variegated varieties. Green leafed varieties grow faster and larger. Variegated varieties prefer shady locations.
Use the chart below to select a Japanese Maple Tree suited to your requirements.
If you would like to learn more or purchase a specific variety of Japanese maple click the variety link to our
JAPANESE MAPLE SELECTION CHART
Dissectum (aka weeping or lace leaf) or Palmatum (aka upright or standard).
Most common to the trade are the lace leaf types, most have red or purple leaves with a few green leafed varieties. I'm not aware of any variegated lace leaf varieties.
Osakazuki and Omure yama are good green uprights with great fall color. Red Select and Ever Red are said to be the more tolerant to direct sun and Virdis and Green Mist are good green varieties for sunnier locations. Please keep in mind the mentioned varieties are more tolerant of sunnier locations, but still may show burning on the leaf edges.
| HARDINESS ZONE | LEAF COLOR | TYPE | VARIETY | HEIGHT FEET | SPREAD FEET |
| 4-8 | Red | dissectum (Laceleaf) | Inaba shidare | 10 | 8 |
| 4-9 | Red | dissectum (Laceleaf) | Tamukeyama | 8 | 8 |
| 5-8 | Green | dissectum (Laceleaf) | Waterfall | 10 | 12 |
| 5-8 | Green | dissectum (Laceleaf) | Virdis | 10 | 12 |
| 5-8 | Green | japonicum | Aconitifolium Maiku-jaku | 10 | 5 |
| 5-8 | Green | japonicum | Green Cascade | 22 | 18 |
| 5-8 | Green | palmatum | Shu Shidare | 3 | 6 |
| 5-8 | Green | palmatum | Green Mist | 4 | 4 |
| 5-8 | Green | palmatum | Murasaki Kiyohime | 4 | 6 |
| 5-8 | Green | palmatum | Green Hornet | 5 | 5 |
| 5-8 | Green | palmatum | Tiger Rose | 6 | 4 |
| 5-8 | Green | palmatum | Winter Flame | 6 | 3 |
| 5-8 | Green | palmatum | Rugose | 7 | 4 |
| 5-8 | Green | palmatum | Ao shime no uchi | 8 | 4 |
| 5-8 | Green | palmatum | Hogyoku | 8 | 4 |
| 5-8 | Green | palmatum | Kagiri Nishiki | 8 | 4 |
| 5-8 | Green | palmatum | Scolopendrifolium | 8 | 4 |
| 5-8 | Green | palmatum | Shigarami | 8 | 4 |
| 5-8 | Green | palmatum | Green Lace | 12 | 4 |
| 5-8 | Green | palmatum | Osakazuki | 20 | 20 |
| 5-8 | Green | palmatum | Sango Kaku | 25 | 22 |
| 5-8 | Green | palmatum | Green | 25 | 25 |
| 5-8 | Red | dissectum (Laceleaf) | Garnet | 5 | 6 |
| 5-8 | Red | dissectum (Laceleaf) | Crimson Queen | 10 | 12 |
| 5-8 | Red | dissectum (Laceleaf) | Red Dragon | 10 | 12 |
| 5-8 | Red | palmatum | Octopus | 5 | 6 |
| 5-8 | Red | palmatum | Skeeters Broom | 5 | 3 |
| 5-8 | Red | palmatum | Tsukushigata | 6 | 4 |
| 5-8 | Red | palmatum | Red Cloud | 8 | 8 |
| 5-8 | Red | palmatum | Pixie | 8 | 4 |
| 5-8 | Red | palmatum | Hubb's Red Willow | 8 | 4 |
| 5-8 | Red | palmatum | Iijima Sunago | 8 | 4 |
| 5-8 | Red | palmatum | Red Emperor | 10 | 6 |
| 5-8 | Red | palmatum | Beni Otake | 12 | 8 |
| 5-8 | Red | palmatum | Burgundy Lace | 12 | 10 |
| 5-8 | Red | palmatum | Hefner's Red | 12 | 5 |
| 5-8 | Red | palmatum | Trompenburg | 15 | 15 |
| 5-8 | Red | palmatum | Bloodgood | 20 | 20 |
| 5-8 | Red | palmatum | Oshio Bene | 20 | 15 |
| 5-8 | Red | palmatum | Atro-purpureum | 25 | 25 |
| 5-8 | Red | palmatum | atro-purpureum (Small Pots) | 25 | 25 |
| 5-8 | Red | palmatum | Atro-purpureum ((SEED)) | 25 | 25 |
| 5-8 | Red | palmatum | Atro-purpureum | 25 | 25 |
| 5-8 | Variegated | palmatum | First Ghost | 6 | 3 |
| 5-8 | Variegated | palmatum | Peaches & Cream | 6 | 6 |
| 5-8 | Variegated | palmatum | Amber Ghost | 8 | 8 |
| 5-8 | Variegated | palmatum | Grandma Ghost | 8 | 4 |
| 5-8 | Variegated | palmatum | Sagara Nishiki | 9 | 6 |
| 5-8 | Variegated | palmatum | Butterfly | 15 | 8 |
| 5-8 | Variegated | palmatum | Shirazz | 15 | 12 |
| 5-8 | Variegated | palmatum | Sister Ghost | 6 | 4 |
| 5-8 | Variegated | palmatum | Geisha | 2 | 3 |
| 5-9 | Green | palmatum | Glowing Embers | 20 | 20 |
| 5-9 | Red | dissectum (Laceleaf) | Ever Red | 6 | 10 |
| 5-9 | Red | dissectum (Laceleaf) | Lion Heart | 10 | 6 |
| 5-9 | Red | palmatum | Ruby Stars | 3 | 2 |
| 5-9 | Red | palmatum | Red Sentinel | 8 | 12 |
| 5-9 | Red | palmatum | Purple Ghost | 12 | 5 |
| 5-9 | Red | palmatum | Twisted Japanese red maple Tree | 15 | 12 |
| 6-8 | Green | dissectum (Laceleaf) | Seiryu | 12 | 6 |
| 6-8 | Green | palmatum | Omure yama | 10 | 15 |
| 6-8 | Red | dissectum (Laceleaf) | Red Select | 6 | 10 |
| 6-8 | Red | dissectum (Laceleaf) | Orangeola | 8 | 8 |
| 6-8 | Red | palmatum | Shishigashira | 6 | 4 |
| 6-8 | Red | palmatum | Shaina | 6 | 4 |
| 6-8 | Red | palmatum | Shishio Improved | 10 | 4 |
| 6-8 | Red | palmatum | Fireglow | 15 | 15 |
| 6-8 | Red | palmatum | Emperor I | 20 | 15 |
| 6-8 | Red | palmatum | Boskoop Glory | 15 | 10 |
| 6-8 | Red | palmatum | Moonfire | 14 | 15 |
| 6-8 | Variegated | palmatum | Beni Schichihenge | 8 | 5 |
Friday, February 6, 2015
Glowing Embers Not Just Another Japanese Maple
 Glowing Embers Japanese maple glows with fall color. Photo by Gary Wade.
Glowing Embers isn't just another Japanese maple. It's a stunning Georgia Gold Medal Winner.
Chosen for its vigorous growth rate, brilliant fall color and adaptability to a range of Southern landscape conditions, Glowing Embers is from University of Georgia horticulture professor Michael Dirr's plant evaluation program.
The original seedling selection from which others have been propagated can be seen at the entrance to the Callaway Building at the State Botanical Garden of Georgia in Athens.
Unlike many Japanese maples that require shade and moist, organic soils, Glowing Embers thrives in full sun. It's hardy in zones 5 to 8, and it tolerates drought better than most trees in its class.
It won't tolerate wet sites, however, or sites where extreme fluctuations in soil moisture are common. Good soil drainage is essential.
The color sequence of each leaf varies as autumn deepens. A single branch may display four distinctly different colors at the same time.
 |
| Glowing Embers Japanese maple is an excellent shade tree. Photo by Gary Wade |
Glowing Embers is a medium-size deciduous tree, growing 30 to 40 feet high with an equal spread. Its leaves are finely toothed, 2 to 3 inches long and about 3 inches wide with five distinct, pointed lobes. The tree has a dense canopy when it's in full leaf. It's an excellent shade tree for residential landscapes where space is limited.
Unlike other Japanese maples that are grafted onto a rootstock, Glowing Embers is called a "clonal" selection. That means it's propagated from cuttings and isn't grafted onto a rootstock. Nurserymen refer to this as "growing on its own roots." They love this characteristic because it makes their production more efficient and less time-consuming.
Once it's established, Glowing Embers will benefit from spring applications of a complete garden fertilizer such as 16-4-8 or 12-4-8.
Prune it as needed to thin out branches and develop a desired shape. Although the tree has above-average drought tolerance, be prepared to provide some supplemental irrigation during droughts.
Glowing Embers Japanese maple is quickly becoming a highly demanded and popular plant in the nursery industry as landscape professionals and home gardeners discover its award-winning qualities.
Subscribe to:
Comments (Atom)